Objectif
- À la fin de ce guide, vous serez capable de :
- Créer une API REST avec Spring Boot
- Configurer CORS pour autoriser les requêtes Flutter
- Développer une application Flutter consommant l'API
- Gérer l'authentification avec JWT
- Déployer et tester l'application complète
- À la fin de ce guide, vous serez capable de :
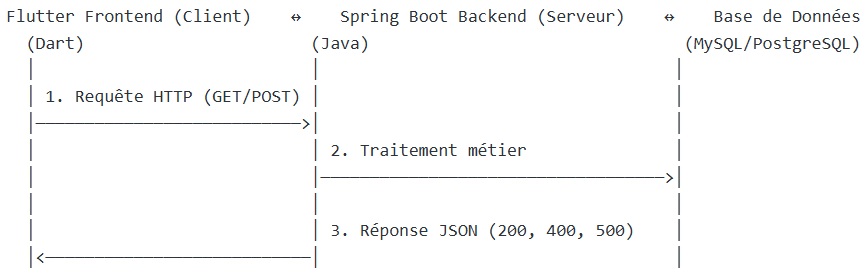
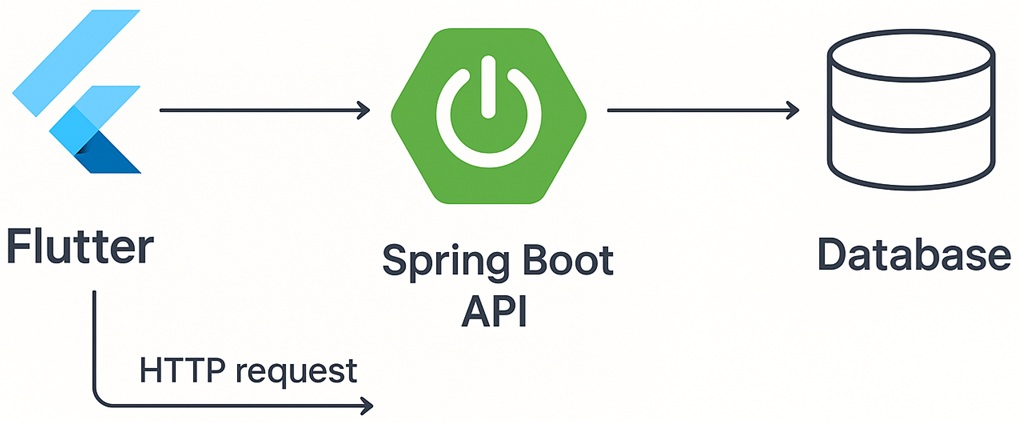
Architecture de l'Application
Partie 1 : Configuration du Backend Spring Boot
Étape 1.1 : Initialisation du Projet
- Utiliser Spring Initializr (start.spring.io)
- Sélectionner les dépendances :
- Spring Web (pour les API REST)
- Spring Data JPA (pour la persistance)
- MySQL Driver (ou PostgreSQL)
- Spring Security (pour l'authentification)
- Lombok (pour réduire le code boilerplate)
Étape 1.2 : Configuration de la Base de Données
- Modifier le fichier application.properties:
# Configuration Database
spring.datasource.url=jdbc:mysql://localhost:3306/nom_bdd
spring.datasource.username=utilisateur
spring.datasource.password=mot_de_passe

# JPA Configuration
spring.jpa.hibernate.ddl-auto=update
spring.jpa.show-sql=true
spring.jpa.properties.hibernate.dialect=org.hibernate.dialect.MySQLDialect

# Server Port
server.port=8080
Étape 1.3 : Configuration CORS
- Créer une classe de configuration CORS :
@Configuration
public class CorsConfig {

    @Bean
    public WebMvcConfigurer corsConfigurer() {
        return new WebMvcConfigurer() {
            @Override
            public void addCorsMappings(CorsRegistry registry) {
                registry.addMapping("/**")
                    .allowedOrigins("*") // En dev, spécifier l'IP en prod
                    .allowedMethods("GET", "POST", "PUT", "DELETE", "OPTIONS")
                    .allowedHeaders("*")
                    .allowCredentials(false);
            }
        };
    }
}
- Créer une classe de configuration CORS :
Étape 1.4 : Création des Entités et Repository
- Définir l'entité Product avec JPA
- Créer un repository ProductRepository qui étend JpaRepository
Étape 1.5 : Implémentation du Controller REST
- Créer ProductController avec les endpoints :
- GET /api/products → Liste tous les produits
- GET /api/products/{id} → Récupère un produit par ID
- POST /api/products → Crée un nouveau produit
- PUT /api/products/{id} → Met à jour un produit
- DELETE /api/products/{id} → Supprime un produit
- Créer ProductController avec les endpoints :
Étape 1.6 : Configuration de la Sécurité (JWT)
- Ajouter les dépendances JWT dans pom.xml
- Créer une classe JwtUtil pour générer et valider les tokens
- Configurer SecurityConfig pour protéger les endpoints
- Créer un endpoint /api/auth/login pour l'authentification
Étape 1.7 : Test de l'API
- Tester tous les endpoints avec Postman ou curl
- Vérifier les réponses JSON et les codes HTTP
Partie 2 : Développement du Frontend Flutter
Étape 2.1 : Initialisation du Projet Flutter
- Modifier
pubspec.yaml:Étape 2.2 : Ajout des Dépendances
dependencies: flutter: sdk: flutter http: ^0.13.5 provider: ^6.0.5 shared_preferences: ^2.2.2 flutter_secure_storage: ^8.0.0Étape 2.3 : Modèle de Données
- Créer lib/models/product.dart :
class Product { final int? id; final String name; final String description; final double price; Product({this.id, required this.name, required this.description, required this.price}); factory Product.fromJson(Mapjson) { return Product( id: json['id'], name: json['name'], description: json['description'], price: json['price'].toDouble(), ); } Map toJson() { return { 'id': id, 'name': name, 'description': description, 'price': price, }; } } Étape 2.4 : Service API
- Créer
lib/services/api_service.dart:
import 'dart:convert'; import 'package:http/http.dart' as http; class ApiService { static const String baseUrl = "http://10.0.2.2:8080/api"; // Android emulator // static const String baseUrl = "http://localhost:8080/api"; // iOS simulator // static const String baseUrl = "http://192.168.1.100:8080/api"; // Physical device static Futureget(String endpoint) async { final response = await http.get(Uri.parse('$baseUrl/$endpoint')); return _handleResponse(response); } static Future post(String endpoint, dynamic data) async { final response = await http.post( Uri.parse('$baseUrl/$endpoint'), headers: {'Content-Type': 'application/json'}, body: json.encode(data), ); return _handleResponse(response); } static http.Response _handleResponse(http.Response response) { if (response.statusCode >= 200 && response.statusCode < 300) { return response; } else { throw Exception('HTTP ${response.statusCode}: ${response.body}'); } } } - Créer
Étape 2.5 : Gestion d'État avec Provider
- Créer
lib/providers/product_provider.dart:
import 'package:flutter/foundation.dart'; import '../models/product.dart'; import '../services/api_service.dart'; class ProductProvider with ChangeNotifier { List_products = []; bool _isLoading = false; List get products => _products; bool get isLoading => _isLoading; Future loadProducts() async { _isLoading = true; notifyListeners(); try { final response = await ApiService.get('products'); final List data = json.decode(response.body); _products = data.map((json) => Product.fromJson(json)).toList(); } catch (error) { throw Exception('Failed to load products: $error'); } finally { _isLoading = false; notifyListeners(); } } Future addProduct(Product product) async { try { await ApiService.post('products', product.toJson()); await loadProducts(); // Reload the list } catch (error) { throw Exception('Failed to add product: $error'); } } } - Créer
Étape 2.6 : Interface Utilisateur
- Créer les écrans principaux :
- lib/screens/products_screen.dart → Liste des produits
- lib/screens/product_form_screen.dart → Formulaire d'ajout/modification
- lib/screens/login_screen.dart → Authentification
- Créer les écrans principaux :
Étape 2.7 : Gestion de l'Authentification
- Stocker le token JWT avec flutter_secure_storage
- Ajouter le token dans les headers des requêtes
- Gérer l'expiration du token et le rafraîchissement automatique
flutter create flutter_spring_app cd flutter_spring_appPartie 3 : Connexion et Communication
Étape 3.1 : Configuration des URLs
- Pour Android Emulator:
- Utiliser http://10.0.2.2:8080 pour accéder à localhost
- Pour iOS Simulator:
- Utiliser http://localhost:8080
- Pour appareil physique :
- Utiliser l'IP locale de votre machine : http://192.168.1.100:8080
- Vérifier que le téléphone et l'ordinateur sont sur le même réseau WiFi
- Pour Android Emulator:
Partie 4: Tests et Déploiement
-
Étape 4.1 : Tests de l'Application
- Tests Backend :
- Tests unitaires avec JUnit
- Tests d'intégration avec @SpringBootTest
- Tests des controllers avec MockMvc
- Tests Frontend:
- Tests widget avec flutter_test
- Tests d'intégration
- Tests manuels sur différents devices
-
Étape 4.2 : Déploiement Backend
- Options de déploiement :
- Heroku (simple pour débuter)
- AWS Elastic Beanstalk
- Google Cloud Platform
- VPS personnel avec Docker
- Configuration production :
- Utiliser HTTPS
- Configurer un domaine personnalisé
- Mettre en place un système de backup
- Monitorer les performances
-
Étape 4.3 : Déploiement Frontend
flutter build apk --releaseflutter build ios --release
- Options de déploiement :
- Tests Backend :
-